Summary and Step-by-Step Guide: Building a Basic Custom Client for Server-Side Google Tag Manager (Examples included)
The article explains how to build a simple custom client for Server-Side Google Tag Manager (sGTM). A custom client allows you to send data in your own format to sGTM, process it, and forward it, going beyond the default Google Analytics clients. Below is a clear step-by-step summary based on the article.
I you need a free sGTM server to test grab one at Stape.io
Step-by-Step Guide to Building a Custom Client in sGTM
1. Create a New Client Template
- In your sGTM container, go to the Templates menu and click New to create a new client template.
- Give the template a name.
2. Build the Custom Client
- The client’s purpose is to:
- Claim requests based on specific criteria.
- Process incoming events.
- Return a response to the sender.
3. Send a Test Request to sGTM
- Send a POST request to your sGTM container endpoint
For example, using Postman to test your sGTM client:

- Add the header
X-Gtm-Server-Previewso you can see the request in preview mode.
To get the value for the header, go to preview mode in your sGTM container and click “Send request manually”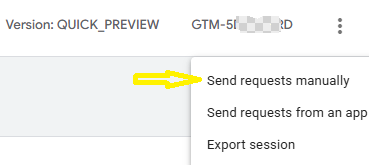
The copy the first code:
- If no client claims the request, you’ll get a 400 response.
4. Claim the Request in Your Client
- Use the
claimRequestfunction to claim the request. - Add logic so the client only claims requests that meet certain conditions, such as a specific URL path.
- Example: use
getRequestPath()to check if the path is/custom-client, and claim the request if it matches.
5. Process the Events
- Read the request body using
getRequestBody. - Parse the JSON data with the
JSONfunction. - Loop through the events and use
runContainer,bindToEvent, andaddEventCallbackto run the container logic (tags, triggers, variables) for each event.
6. Return a Response (Optional)
- By default, sGTM returns a 200 response if a client claims the request.
- You can customize the response using
returnResponse,setResponseHeader, andsetResponseStatus. - For example: add a custom header with a success message, or validate a secret key in the request.
7. Example of GTM request tag and sGTM client code
Example for client side GTM custom HTML code sending data:
<script>
fetch('https://sst.your-sgtm-server.com/mycustom-client', {
  method: 'POST',
  mode: 'no-cors',
  headers: {
    'Content-Type': 'application/json',
    'X-Gtm-Server-Preview': 'copy-your-gtm-preview-string-here-see-step-3'
  },
  body: JSON.stringify([
    {
        "event_name": "page_view",
        "page": {
            "page_url": "https://test.nl/test-page",
            "page_path": "/test-page"
        }
    },
        {
        "event_name": "click",
        "page": {
            "page_url": "https://test.nl/test-page",
            "page_path": "/test-page"
        }
    }
])
})
.then(function(response) {
  if (!response.ok) throw new Error('HTTP-error: ' + response.status);
  return response.text();
})
.then(function(data) {
  console.log('Success:', data);
})
.catch(function(error) {
  console.error('Error:', error);
});
</script>
Example of code for sGTM client template:
const claimRequest = require('claimRequest');
const getRequestPath = require('getRequestPath');
const getRequestBody = require('getRequestBody');
const runContainer = require('runContainer');
const addEventCallback = require('addEventCallback');
const JSON = require('JSON');
const returnResponse = require('returnResponse');
const setResponseStatus = require('setResponseStatus');
const setResponseHeader = require('setResponseHeader');


//Claim the request sent to /mycustom-client
if (getRequestPath() === '/mycustom-client') {
    claimRequest();

    //Reading the request body and parsing the data
    const requestBody = getRequestBody();
    const events = JSON.parse(requestBody);

    //Running the container for each event
    events.forEach((event) => {
        runContainer(event, (bindToEvent) => {
            bindToEvent(addEventCallback)((containerId, eventData) => {

            });
        });
    });

    //Custom response message.
    setResponseStatus(200);
    setResponseHeader("message", "request successfully processed!");
    returnResponse();

}
8. Use Event Data in Variables, Triggers, and Tags
- Now you can create variables, triggers, and tags in sGTM that use the event data from your custom schema.
- For example: create a Analytics tag and map your custom parameters to your Analytics parameters.
9. Send data to custom endpoint in sGTM
We can also send the data to an custom endpoint or API.
For this we can use a tag template form the Community Template Gallery.
In sGTM choose “New” tag, then click “Tag configuration”

Then search for “HTTP request”
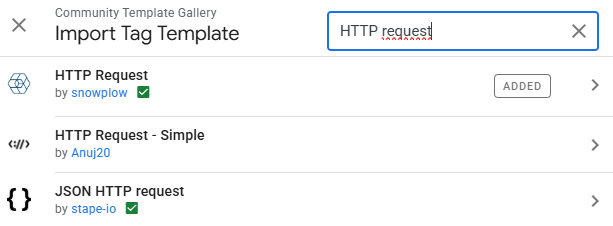
I used the first by snowplow and looks like this:

Overview of Key sGTM Functions Used
| Function | Purpose |
|---|---|
| claimRequest | Claim the request for processing |
| getRequestPath | Get the path from the incoming request |
| getRequestBody | Read the body of the request |
| JSON | Parse JSON data |
| runContainer | Run container logic for an event |
| bindToEvent | Bind API context to the event |
| addEventCallback | Callback after all tags for an event have run |
| setResponseStatus | Set HTTP status code for the response |
| setResponseHeader | Add custom headers to the response |
| returnResponse | Send the response back to the sender |
Summary
With these steps, you can build your own client in sGTM that claims requests, processes custom events, and returns responses. This allows you to handle data formats and validations more flexibly than with the default sGTM clients. You gain full control over how and when data is processed and forwarded within your server-side tagging setup.